Friday, 6 July 2012

User Setup

The default pi user has sudoer (super user) privileges which provides access to administrative functions which might be beyond the scope of the average user or even dangerous to the security of the system.

The best approach (one which I have not done until now) is to create user accounts for each individual user who will be using the shell and setting appropriate privileges to each user.  The following describes how this can be achieved for a new user called tykus:
$sudo useradd tykus
This has created a user, but we now need to set a password for this user:
$sudo passwd tykus
Enter new UNIX password:
Retype new UNIX password:
passwd: password updated successfully
$
We are asked to enter a new UNIX password and to confirm it.  We're not quite done just yet because this method does not automatically create the new user's home directory, although it does assume it will be located at /home/tykus (in this case).  So our next step is to create that directory:
$sudo mkdir /home/tykus
If we run a list command ($ls -l), we are given information about the contents of the /home directory
$cd /home
$ls -l
total 8
drwxr-xr-x 16 pi   pi   4096 Jul  6 10:11 pi
drwxr-xr-x  2 root root 4096 Jul  6 11:29 tykus
$
The information provided tells use what is in the directory, who owns it and what permissions are associated with it, specifically each line tells us:
  • Field 1: permission flags (10 of them!)
  • Field 2: link count
  • Field 3: owner of the file
  • Field 4: associated group for the file
  • Field 5: size in bytes
  • Field 6-8: date of last modification
  • Field 9: name of file
Currently, the /home/tykus directory is owned by the root user - if we were to login as tykus now, we would be unable to write to the directory although we (along with any other users) could read and execute the contents. For example, if we try to create a file new_file in /home/tykus as the pi user, we will not be allowed
$touch /home/tykus/new_file
touch: cannot touch `new_file': Permission denied
$
Whereas, if we try to execute a python script in the same directory (as pi), we can do that:
$python /home/tykus/hello.py
Hello World!
$
We need to give the directory to its rightful owner:
$sudo chown tykus:tykus /home/tykus
Note: if there were already contents in this directory (such as the python script above), we should include a -R option to recursively change permissions for all directories and files in the directory. For security reasons we will also change permissions so that only the owner can read, write and execute the home directory:
$sudo chmod 700 /home/tykus
Preferred Shell If we check the /etc/passwd file, our new user is added to the end; included details are colon (:) separated as follows: Username:Password:User ID:Group ID:Comment:Home directory:Shell (more information here)
tykus:x:1002:1002::/home/tykus:/bin/sh
So tykus will log in to the sh shell, whereas we prefer the Bourne shell (bash), so we can change /bin/sh to /bin/bash (or whatever shell is preferred) We can now login as tykus and keep all of our files private from other users!

Tuesday, 3 July 2012

GPU Capability

The latest MagPi, the Raspberry Pi community’s free-to-download magazine, came out today and within it was a section on tweaks and fixes along with some of the free software which can be installed, one of which was the omxplayer. I had come across this package previously and played with it briefly on my Ubuntu Server, which was ultimately intended to run headless, so combined with the crappy performance I was seeing anyway, I didn't spend very much time with.  But given the RPi's Broadcom BCM2835 chipset, which is designed to handle intensive multimedia, it was an opportunity to have a look at the packages capabilities again. OMXplayer is run from the command line, meaning there is no GUI overhead in terms of a desktop environment from which it must be run.

Installing OMXPlayer

The debian package was liberated as follows:
wget http://seyrsnys.myzen.co.uk/rpi/omxplayer_0.0.1-arm.deb
and installed
sudo dpkg -i omxplayer_0.0.1-arm.deb
along with dependencies (-f fixes broken dependencies resulting from the previous line):
sudo apt-get -f install

Mounting Shared Folders

The omxplayer package was now installed, but I hadn't yet mounted my shares from the server on the RPi. In order to get this sorted out. I have Samba on the Ubuntu server because I share to Windows machines elsewhere on my network, so to keep things simple, I went the same route for the RPi mountings also.
The first step is to create a credentials file in the home folder of the default pi user:
sudo nano .smbcredentials
Within this file there are two lines:
username=my_username
password=my_password
Because this is not an entirely secure means of storing username and password data, the file is then set as read-only for the root user, although any user with access to root will be able to read it - which on the RPi's default user is anyone!
sudo chown root:root ~/.smbcredentials
sudo chmod 600 ~/.smbcredentials
The next step was to create mount points for the shared music and video folders:
sudo mkdir /mnt/music /mnt/video
Next, I changed the File System Table file /etc/fstab which will mount shared folders to those local folders whenever the RPi boots:
sudo nano /etc/fstab
Add in this file I added a line for each folder to be mounted as follows:
//server/music /mnt/music smbfs credentials=/home/pi/.smbcredentials,uid=1000,gid=1000
//server/video /mnt/video smbfs credentials=/home/pi/.smbcredentials,uid=1000,gid=1000
A quick reboot and we're done; checking the contents of /mnt/video shows the contents of the server's shared folder as expected.

Playing a video

The last thing to do is actually play a video and see what happens! The video of choice is Big Buck Bunny, an open source video which was made using open source software such as Ubuntu, Inkscape, Blender and GIMP. What's more, this is a high definition video, outputting 1080p, which whould really exercise the RPi's GPU!  And the result? Pin sharp rendering which my P&S camera simply cannot do justice to!


The only issue I now need to overcome is putting the audio out through the HDMI port along with video, but in the interim the audio socket on the RPi is doing the job perfectly.

Quite hungry in terms of CPU demand!!


Credits for the post must go to:
http://www.themagpi.com
https://help.ubuntu.com/community/MountWindowsSharesPermanently
http://www.bigbuckbunny.org


Saturday, 30 June 2012

Interfacing

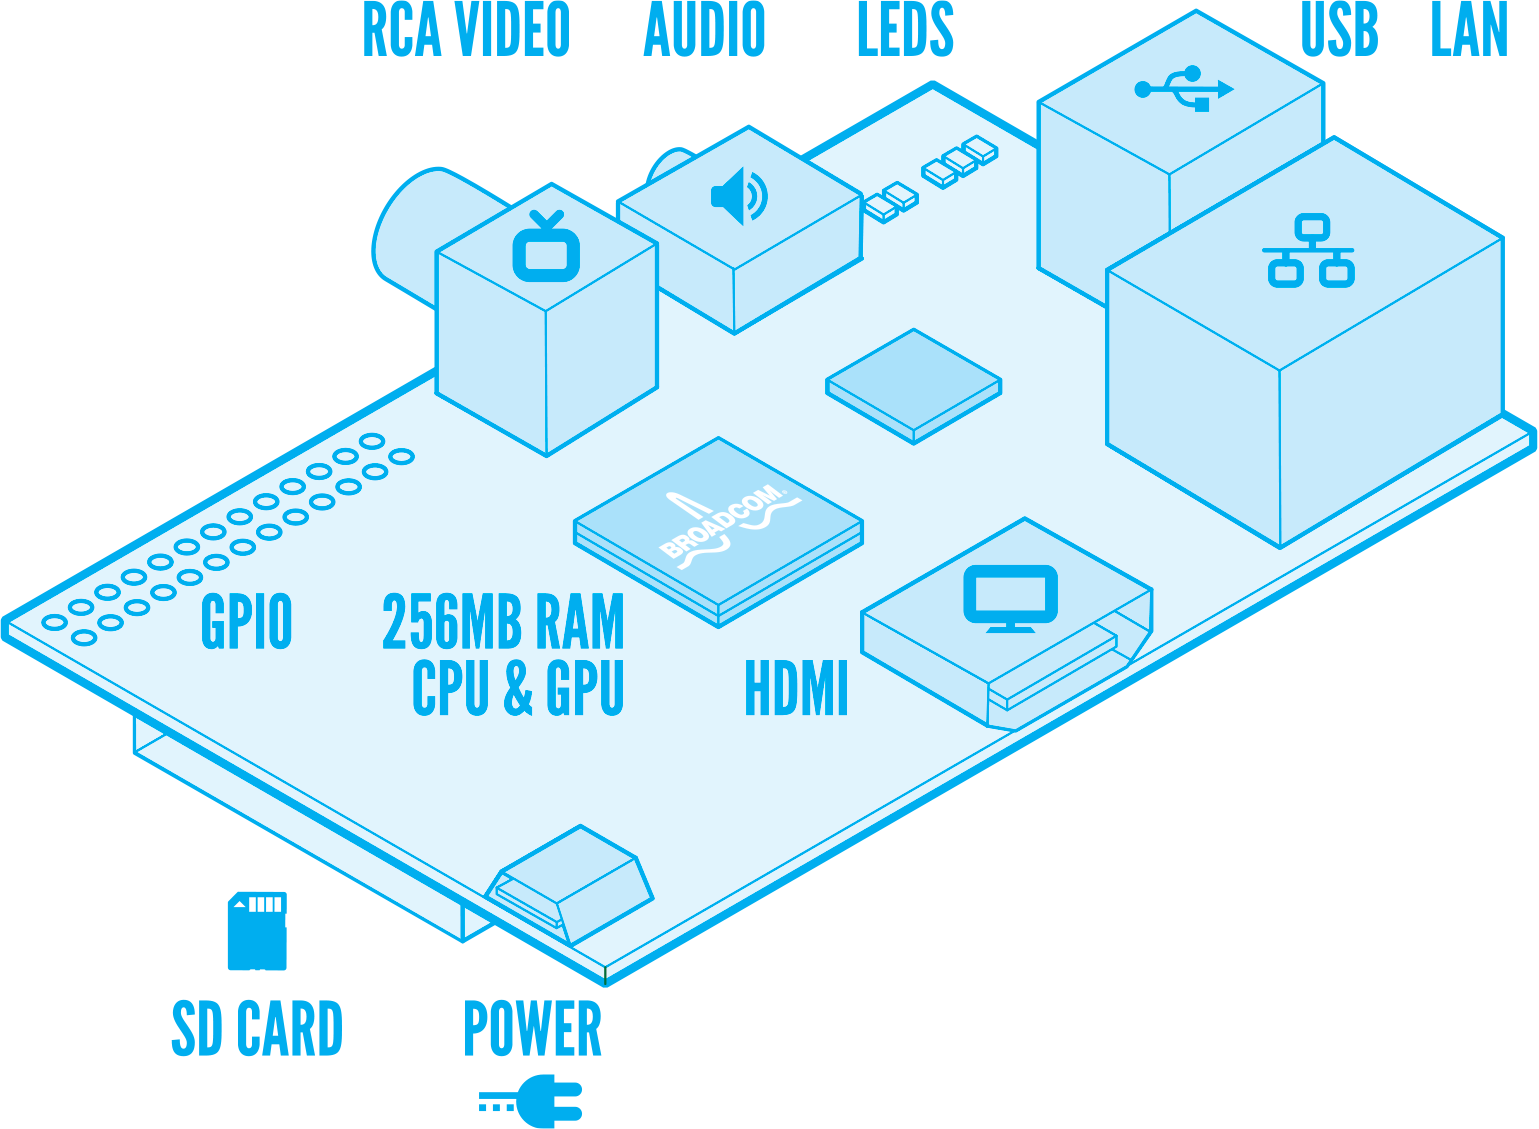
The anatomy of the Raspberry Pi includes a set of general purpose input/output (GPIO) pins which are on the left of the image below. The pins are general purpose insofar as they can be used for anything the user desires, unlike the HDMI, for example, which has a sole specified purpose of carrying video and audio. The GPIOs allow the Raspberry Pi to control electronic circuits by using a library (in Python or C) to send (output) or receive (input) signals through the GPIO header. The Raspberry Pi GPIO is low powered, so will typically require an expansion board to drive higher powered components such as lamps and motors etc.
Because the GPIO is directly controlled through the processor, there is a potential problem of destroying the RPi by making incorrect connections, however, some protection is afforded by using the expansion board. There are a bunch of starter projects being described on the Raspberry Pi forums which give enough detail to get from beginner (2 years of "electronics" a second level school doesn't count for much twenty years later!) to a working smile circuit. The potential is basically endless, it would be interesting to find some application where the RPi through a web interface could switch on/off, say central heating system; maybe develop this further to email if the temperature is above/below some predefined level. For now, if I could successfully make a traffic light on a breadboard, I'd be happy. There are probably a lot of things I could/should be doing next week, but the possibility to play with a breadboard, a bunch of resistors and LEDs might take precedence! So Maplin it is on Monday morning...

Thursday, 28 June 2012

Pick a number, any number

I have been learning C lately, just for the craic, and was trying to write a small program on the RPi to roll a dice - still not programming the next space shuttle - which to my mind should be very easy since there is a random number function in C - the output of a number of iterations was a little too predictable though:


2, 5, 4, 2, 6, 2, 5, 1, 4, 2
Even though I have been learning to program for quite a while, I have never used a random number generator for anything.  It comes as a surprise when computers aren't behaving as I expect - this is one of the limitations of being self-taught, that you don't get some of the very basics about how computers behave.  This type of thing is probably covered in Programming in C 101, but had me thinking I should play the numbers in the Lottery this weekend!
Why is a random number function so predictable??
Because the rand() function is seeded with the same number everytime - so the function is pseudo-random really.  A truly random number generator will use some non-constant value as a seed, typically system time.


Tuesday, 26 June 2012

Watch your P's and p's

I have photos and duplicates of photos everywhere on my PC, laptop etc. and have been trying to find a piece of software to organise my digital photos for a long time, and have never found exactly what I was looking for, so I have attempted to come up with a solution myself.


I was careful when renaming files according to my own predefined convention based on date taken. I use XnView to extract the relevant EXIF metadata and rename the files as follows:
YYYY-MM-DD HH-MM-SS {Camera Model}
This is working perfectly as it has generated a unique filename for all of my photos (I don't tend to do bursts which would all have the same timestamp) and I have been able to separate the photos into a directory structure base on YYYY/MM using the following simple shell script:


#!/bin/bash

# Sorts the files in the current folder to relevant folder ../YYYY/MM based on each file name

for file in *
do
 Year=$(echo $file | cut -c-4)
 Month=$(echo $file | cut -c6-7)

 $(mv -n  "$file" ../$Year/$Month/)
done


My problem is I haven't been so careful about the file extensions in XnView.  There is an option to have the file extension convert to UPPERCASE or lowercase - I used have both unfortunately.  The problem occurs when I have duplicates of photos which have the same name, but a different extension case - and Linux is case sensitive.  I end up with duplicates of the same photo simply because the extension  is different.


Now I am trying to write a script to untangle the mess I have created...


#!/bin/bash

#######################################################################
######          Converts a file extension to lowercase           ######
#######################################################################

# Counter variables
renamed=0 # this counts the number of files which were renamed
skipped=0 # this counts the number of files which were not renamed

# Loop thru the files in the current directory
for file in *
do
 # Extract the filename and extension from each file
 filename=$(echo "${file%.*}")
 EXT=$(echo "${file##*.}")

 # Convert the extension to lowercase
 ext=$(echo "${EXT,,}")

 # Proposed filename and extension
 newFile=$(echo "${filename}.${ext}")

 # Rename the file only if the extension was NOT already in lowercase
 if [ $ext != $EXT ];
 then
  # Check if the proposed new filename already exists
  if [ -e $newFile ];
  then
   # Add a duplicate identifier to end of filename
   newFile=$(echo "${filename}_01.${ext}")
  fi
 
  # Rename the file
  echo "Renaming file: $file >>>>> $newFile"
  $(mv '$file' '$newFile')
  # Increment renamed files counter
  renamed=$((renamed+1))
 else
  echo "Skipping file: $filename.$ext"
  # Increment skipped files counter
  skipped=$((skipped+1))
 fi
done

# Output summary information
echo "There were $renamed files renamed and $skipped files skipped"
It's not quite there yet; I need to get it to work recursively down a directory structure eventually, but first I need to make sure it works. Anyone know why I am getting a too many arguments error for the file exists test on line 28??? Help???

Monday, 18 June 2012

Ruby on Rails on Raspberry Pi

Success!  I have managed to get Ruby on Rails installed on the RPi on Saturday, although quite when it finished, I don't know!  The instructions I had followed warned that the process would take a while, but I hadn't expected it to take sooooo long! I went to bed at 2am and the installation which started at 11.30pm was still going! When I checked back on Sunday morning it had completed with the latest versions of Ruby & Rails installed (I subsequently rolled back to Rails version 3.0.10 for the Server Side Web Tech course)


In the meantime, I was making sure that Rails was also installed and working correctly on my laptop - I have some homework to get finished before Monday! Having the same Rails versions installed side-by-side on (reasonably) standard hardware and the RPi will give me an opportunity to benchmark the credit card sized hardware.  I suspect that Ruby on Rails on RPi (RoRoR!) will be slower to execute a similar instruction than the laptop or any other "conventional" hardware; Rails might be beyond its intended scope.

I'll have a go at both simultaneously and see how the Raspberry Pi compares.

Saturday, 16 June 2012

Who's been looking at your blog??


While checking out the stats on this blog I noticed that there were some unexpected views from US (80 pageviews), and Germany (2) along with a whopping 156 pageviews from (probably) my classmates in Ireland - hello fellow HDSWTECHers!


I should probably offer an apology to anyone who arrived on this blog expecting some useful insight and  original information about the RPi; this is blogging for blogging sake - I am being graded on it...

So here's my tip: there is plenty of useful, insightful and informative content on the RPi elsewhere, such as the Raspberry Pi site and the excellent tutorials on Raspberry Pi Beginners YouTube channel.

What I have been doing (instead of installing all those packages which would support the Web Technologies course) is putting an XBMC image on another SD card - I suspect a large majority of the Raspberry Pi's have been bought solely for this purpose.


I have been a fan of XBMC for a long time.  When the original Xbox was succeeded by the Xbox360, the price of the original console fell dramatically to the extent that a second-hand console could be had for about €20 (sometimes including a few games).

The Xbox Media Center (XBMC) was an open source project which hacked the Xbox games console and replaced the stock dashboard with a customisable media centre which allowed users to play games, watch video, listen to music and/or view pictures on their television sets.  This is one of the reasons that the NSLU2 I had cut my Linux teeth on was replaced by an old PC which runs Ubuntu Server - the NSLU2 was stretched beyond its capabilities and the user xperience from my couch was slow loading and frequent buffering.

The XBMC project has since left the original console behind, concentrating on HTPC's, jailbroken Apple TV's  and iPads as well as running as as applications in Windows, Mac OS and Linux.  Consequently, they no longer support the original console directly although the community is keeping the releases reasonably up to date although the original hardware struggles with some modern video formats.

The image of choice for now is Raspbmc which  is an XBMC and linux-based OS distribution for Raspberry Pi - the beauty of the RPi is that the Raspbmc OS image can be loaded on a separate SD card (2GB is sufficient) to the Debian image.  This means that the RPi can be very simply booted as a media center which can playback 1080p content, or as a learning tool providing command line or GUI interfaces for learning to program, depending on the SD card being used at any particular time.